
Managing Open Positions
The Positions tab in the CleaRank Trading Simulator is where you manage trades you already hold. It shows live unrealized P&L and the margin locked per position, partial and full closes, Flat All, and every working order that has not filled yet.
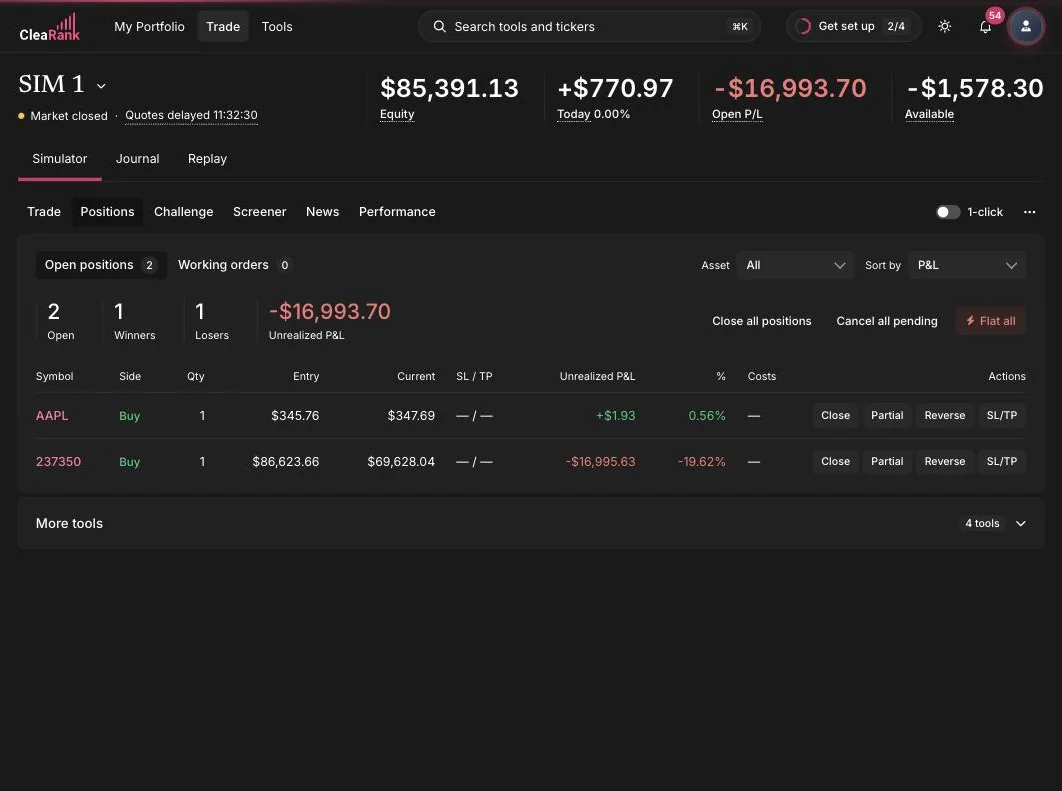
The summary strip
At the top of the tab, four counters summarize your book at a glance: Open (number of open positions), Winners and Losers (how many are currently up or down), and Unrealized P&L (the combined profit or loss if everything closed right now). Unrealized P&L matches the Liq P&L figure in the account strip above.
Open Positions
The Open Positions list shows each position with its live P&L, updated against current market prices. You can filter by Asset Type (All, or a single class) and sort, for example by P&L, to bring your biggest winner or loser to the top. Open a position’s detail to see its full context, including the margin locked for that specific position.
Margin per position
Every open position locks a portion of your balance as margin, and that amount is shown per position. The sum of all locked margin is the Margin figure in the account strip, and what is left over is Available for new trades. If Available runs low, closing or trimming a position releases its margin. To estimate margin before entering a trade, use the Margin Calculator or the Margin chip on the order ticket.
Setting a stop loss and take profit from the position row
A position with no stop has no defined worst case, so the loss is bounded only by how long you keep watching. The good news is that entering without protection is recoverable: you can attach or edit brackets after entry, directly on the position row, so the first thing to do after any unprotected fill is put a stop on it.
The row’s stop loss field is the price at which the position closes to cap the loss. The take profit field is the price at which it closes to lock the gain. Clearing a field removes that side and leaves the other one working. Attaching the pair at entry instead is covered in Advanced Orders.
Size the stop in money, not by where the line looks comfortable. Multiply the distance between your entry and the stop by the position quantity, and keep the result inside 1 to 2 percent of account equity. At 1 percent, ten losing trades in a row costs about 10 percent of the account, which is recoverable. If the stop distance the setup needs is too expensive at your current size, reduce the quantity rather than moving the stop closer to the entry.
There is a second reason to record a stop on every trade. The R-multiple, which expresses a result in units of what you risked, can only be measured on trades where a stop was recorded. Where none was, the R value is either missing or filled in from an assumption rather than from the risk you actually took, so closing trades without a stop quietly degrades your own Performance analytics months later.
Closing and partially closing
From a position you can:
- Close: exit the whole position at the current market price.
- Partial close: exit only part of the quantity, keeping the rest working. This is the classic way to bank some profit at a first target while letting a runner continue.
Fills and closes are priced against real market quotes, and each closed portion becomes a completed trade that is automatically mirrored into your Trade Journal.
Reverse a position
When your read on a market flips, closing the position and then opening the opposite side as two separate actions leaves you flat at exactly the moment you wanted to be positioned, and it doubles the number of chances to mistype a size. Reverse does both at once: it closes the open position and opens the same quantity on the other side of the market.
Check two things immediately afterwards. Reversing carries no stop loss or take profit across from the old position, so the new one starts unprotected and needs a stop attached straight away. And confirm the quantity is still the quantity you want, because the size that suited the original idea is not automatically the right size for the opposite one.
The COSTS column
What decides whether a strategy survives is not the size of the move you caught, it is the move minus what the round trip cost you. The COSTS column shows the trading costs attached to a position, and those costs come out of realized P&L when it closes, so the gross move on the chart is never the number that reaches your balance.
Read costs against your average win rather than in isolation. The place they show up is profit factor, which is gross profit divided by gross loss: above 1.0 means you are net profitable, 1.5 or better is a comfortable edge, and below 1.0 means the strategy is losing money. If accumulated costs are a large fraction of the average win, profit factor sits near 1.0 no matter how good the entries look, because the edge is being consumed on the way in and out.
When that happens, a better entry is rarely the fix. Take fewer and larger trades, or hold longer, so each round trip’s cost is spread across a bigger move. Both figures, average win and profit factor, are in the Performance tab.
Sort by Elapsed
The position you have held longest is usually the one you have stopped managing. Elapsed is the time since the position was opened, and sorting the Open Positions list by it puts the oldest trades at the top, which is where the ones you have been avoiding tend to sit.
The benchmark here is your own, not a fixed number of hours. Compare Elapsed with the Avg Hold figure in the Performance tab, which is how long your closed trades typically stayed open. A position running several times past your typical hold, on a plan that was meant to be intraday, is normally a loser being held in hope rather than a winner being given room.
When you find one, do one of two things: close it, or write down a fresh reason to keep it along with the price that would prove the idea wrong. “It might come back” is not a reason, and an aging position with no stop attached is the combination that does the most damage to an account.
Working Orders
The Working Orders list holds every order that exists but has not filled: limits waiting for their price, stops waiting for their trigger, brackets protecting positions, conditional orders, OSO children waiting on parents, OCA group members, and market-on-open orders queued for the next session. Badges show each order’s role so a complex trade plan stays readable. Cancel any working order from its row before it triggers.
Bulk actions
- Flat All: closes every open position at market. It also lives in the Trade tab’s workspace bar for emergencies, one press and you are flat.
- Close All Positions: closes all open positions from the Positions tab.
- Cancel All Pending: cancels every working order at once, useful after Flat All so no leftover bracket or stop re-enters the market without you.
Frequently asked questions
What is the difference between Flat All and Close All Positions?
Both close every open position at market. Flat All is the quick-access version that also sits in the Trade tab workspace bar; Close All Positions is the Positions tab equivalent. To clear working orders as well, use Cancel All Pending.
How does partial close work?
Choose a position, select partial close, and specify how much of the quantity to exit. That portion is closed at the current market price and journaled as a completed trade; the remainder stays open with the same entry price.
Does Reverse keep my stop loss and take profit?
No. Reverse closes the position and opens the same quantity on the opposite side, and the new position starts with no brackets attached. Set a stop on the position row as soon as the reverse is done, and confirm the size still fits your risk on that side of the market.
Why is part of my balance locked as margin?
Each open position reserves margin so the account can cover it. The locked amount is shown per position and summed in the account strip. Closing or trimming positions releases margin back to Available.
Where do closed trades go?
Every closed simulator trade, full or partial, is automatically mirrored into your Trade Journal and feeds the Performance tab analytics. Nothing needs to be logged by hand.
Try it yourself
Open a practice position, trim it with a partial close, and watch the margin release.
Related articles
CleaRank tools are for education and analysis. Nothing in this guide is financial advice.